3D Clipping for Realtime Graphics
Hamburg (Germany), the 21th November 1997. By Nils Pipenbrinck aka Submissive/Cubic & $eeN
Table Of Contents
Clipping is very important in 3D graphics. The main purpose is to
prevent the triangle drawing routine from trashing memory and drawing
out of the screenspace. 3D-clipping can also help you to speed up your
rendering engine. I'll first explain the basics and at the end you'll
find some ideas for the speed issue.
Basically there are two different approaches to clipping. The first
and most common is the 2D clipping algorithm. In this kind of
algorithm the clipping is done at the last stage of rendering. The
triagle-routine used to render the polygons onto the screen make sure
that you don't draw outside the screen. This can be very fast, but
increases the complexity of the triangle-filler (and it's not as easy
as 3D-clipping can be). This clipping method works directly with
two-dimensional screen-coordinates.
In 3D clipping you do everything in 3D space. (In my examples it's
done in camera-space. If you don't know about this don't worry about
it.) If we want to clip in 3D space we need to have a description of
the stuff the camera of our rendering-engine can see. When we use
perspective projection (the most common projection type) this space
can be described as a frustum.
A frustum looks like a clipped pyramid.
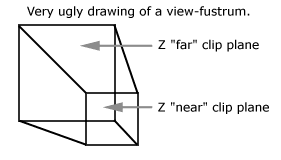
The camera (not seen on this drawing) is placed behind the z near clip plane.
And this plane is necessary. It avoids nasty "divide by zero" errors and also
makes sure that you don't see anything that's behind you. Mathematical cameras
are not like your eyes are. Your eyes can't look behind themselves, but a mathematical
camera can. In this tutorial I'll skip the far clipping plane. If you want to
use one feel free to add one.
How do we represent this frustum? When we want to
describe the frustum we use 6 planes. The structures might look like
this (I'll use them during my tutorials):
struct tvector
{
  float x,y,z;             // standard vector
};

struct plane
{
  tvector  normal;         // normalized Normal-Vector of the plane
  float    distance;       // shortest distance from plane to Origin
};

struct frustum
{
  plane sides[4];          // represent the 4 sides of the frustum
  plane znear;             // the z-near plane
}
Just as an example: If you want to construct a plane from 3 points do it this way:
plane p;                      // plane to construct from a,b and c
tvector a,b,c;                // points to build a plane from
{
   // build normal vector
   tvector q,v;
   q.x = b.x - a.x;    v.x = b.x - c.x;
   q.y = b.y - a.y;    v.x = b.y - c.y;
   q.z = b.y - a.y;    v.x = b.z - c.z;
   p.normal = crossproduct (q,v);
   normalize_vector (q.normal);

   // calculate distance to origin
   p.distance = dotproduct (p.normal, a);  // you could also use b or c
}
For our frustum we don't have 3 points of the view-frustum, but we know a little
bit about the opening angle of our view-frustum. It's dependent on the perspective
distortion and the screen-size we use.
I used this pice of code in my 3D-engine:
void setup_frustum (float project_scale, float SX, float SY)
// * project_scale is the projection scaling factor used in the perspective
//   projection. It's the value you multiply x and y with before you divide
//   them by z. (usually I use 256 for this value).
//
//  * SX and SY are the size of the viewport you want to draw at (320,200 anyone?)
{
  float angle_horizontal =  atan2(SX/2,project_scale)-0.0001;
  float angle_vertical   =  atan2(SY/2,project_scale)-0.0001;
  float sh               =  sin(angle_horizontal);
  float sv               =  sin(angle_vertical);
  float ch               =  cos(angle_horizontal);
  float cv               =  cos(angle_vertical);
  // left
  sides[0].normal.x=ch;
  sides[0].normal.y=0;
  sides[0].normal.z=sh;
  sides[0].distance = 0;
  // right
  sides[1].normal.x=-ch;
  sides[1].normal.y=0;
  sides[1].normal.z=sh;
  sides[1].distance = 0;
  // top
  sides[2].normal.x=0;
  sides[2].normal.y=cv;
  sides[2].normal.z=sv;
  sides[2].distance = 0;
  // bottom
  sides[3].normal.x=0;
  sides[3].normal.y=-cv;
  sides[3].normal.z=sv;
  sides[3].distance = 0;
  // z-near clipping plane
  znear.normal.x=0;
  znear.normal.y=0;
  znear.normal.z=1;
  znear.distance = -10;
}
Some notes:
- All plane normal vectors should point inside the frustum!
- I subtract a very small value from the angles and thus make
the frustum a little bit smaller than it should be..
I do this to avoid
round-off errors. This setup works perfectly, I'vr never had a situation where the
clipping didn't work...
- Did you also notice that most of the plane distances are zero?
This is correct
because the camera is placed at the origin of the coordinate system
and thus all planes go directly through it. This will save some computations later,
when we clip polygons against the view-frustum.
- The z near plane is placed 10 units behind the projection-plane. I experimented
with different distances and found that this value works ok. Try some different
values and see what happens.
- I only used 5 planes instead of 6. I ignored the far clipping plane (since it's
not really important). If you want one, than add it yourself: the normal vector
would be <0,0,-1>, and the distance? Well, choose one.. 1000 might be a good value to start with.
Now we want to clip a polygon against our view-frustum. To do so,
we first need a clipping routine to clip a line against a plane.
Afterwards we'll extend this to polygons vs. planes and finally to
planes vs. frustum.
A line in 3D-space is defined by two points (let's call them A and B). We can now
look on which side of the plane these points are. We only have to calculate the
distance from the point to the plane.
distance = dotproduct (point, plane.normal) - plane.distance;
The distance is < zero if the point is on the backside of the
plane. It's zero if the point is on the plane, and positive
otherwise. If both points have a negative distance we can remove
them. The line will be entirely on the backside of the plane. If both
are positive we don't have to do anything (the line is completely
visible). But if the signs are different we have to calculate the
intersection point of the plane and the line:
float da;   // distance plane -> point a
float db;   // distance plane -> point b

float s = da/(da-db);   // intersection factor (between 0 and 1)

intersectpoint.x = a.x + s*(b.x-a.x);
intersectpoint.y = a.y + s*(b.y-a.y);
intersectpoint.z = a.z + s*(b.z-a.z);

// need to clip more values (texture coordinates)? do it this way:
intersectpoint.value = a.value + s*(b.value-a.value);
To clip the line just replace the point on the backside of the polygon with
the intersection point. That's all.
All we have to do to clip a polygon against a plane is to clip each
line of the polygon to the plane. Note that if you work with triangles
you might get a quad after you've clipped it, so make sure that during
clipping you can store the additional vertices and triangulate the
clipped polygon afterwards.
I don't give the code here, it's good practice, and if you really
don't know how to do it either contact me or look into the sourcecode
I provide at the end of this tutorial.
Clipping to the frustum just extends from the 'clip to plane'
stuff. You only have to clip the polygon against each plane of the
frustum, one after another. Sure, there are more advanced and faster
algorithms to do this, but after you understand this simple brute
force approach you will be able to understand the better Liang-Barsky
3D clipping algorithm (and all the others). If you want to learn more
about them buy yourself the great Computer Graphics, Priciples and
Practice book. (you'll need it anyway if you want to do serious
3D-coding)
With this approach to 3D clipping you'll spend a lot of time in the
clipping code. This is a problem, but it can turn into an advantage:
Your polygon code doesn't need to care about clipping any more and
thus can be a lot faster and smaller. If you have different kinds of
polygons (textured, lit or even bump-mapped) you have less setup-code
and thus your polygon code is easier to maintain. All hardware
accelerated 3D-cards I know don't clip on their own. Therefore you
need 3D-clipping anyway if you want to use them. If you use
boundary-boxes (you should definitely do so) you can save a lot of
time. Just check the 8 vertices of the boundary box against the
frustum-planes and see which planes intersect the boundary box. You
can build a bit-mapped outcode number out of these values and call an
optimized clipping routine for this object. Those objects that are
entirely outside the frustum don't need to be drawn at all, so you can
ignore them completely, and for the objects that need no clipping at
all you'll gain a lot of speed because your triangle-fillers don't do
the needless clipping anymore. Ok, this is a lot of code to write, but
if you want a 3D-engine that flies you should do so.
I learned a lot while I made the 3D-clipping code for my engine, and I wasn't
able to find any good web-pages about 3D-clipping on the net. I know that this
approach is slow, but at least it works. Again I recommend the 3D-bible:
Computer Graphics: Priciples and Practice
Foley et al.
Addison-Wesley Publishing
ISBN: 0-201-12110-7 (this is the english second edition)

(1174 pages about graphics-programming... I can't live without it!)
Don't be shocked that this book dates back to 1990. The
standard-algorithms don't lose validity (and the 'historic' chapters
of this book are definitely fun to read, hahaha)... You'll need a good
mathematical background to understand some chapters (Radiosity
anyone?) but there is a short math-primer in the appendix that I use
to read from time to time to fresh-up my vector math...
Download Source + EXE of my very simple and never finished 3D-engine.
Download a 3DS ASC to internal format converter
Warning: Don't expect this to be good code! I simply hacked
it together in one or two weeks... It uses 3D clipping and it's very
well commented (some parts in german, but the important stuff is in
english). At least it works, and maybe this is a good starting point
for someone who plans to write his own 3D-engine.
You can rip out the clipping part if
you want, but send me a comment or give me a credit if you do so.
Oh, before I forget it: The polygon code was written by Scholar, once a coder of Cubic & $een.
© by submissive